 On most microstock sites accepts vector illustrations in EPS format (in version Illustrator 8) with generated JPG preview of the illustration. Some of them wants it in ZIP, some need just small preview and others big. In this article I will show you the best and easiest way, how to prepare the illustration in desired EPS format and how to generate JPG preview.
Before you upload your vector illustration on some microstock site, you have to:
- Check and fix potential defects, which can cause illustration’s rejection
- Save illustration in EPS format
- Create JPG preview
 Preparation tasks
Before we create the JPG preview and EPS export, we need to check the illustration for potential issues and fix them.
Clipping mask – hiding objects behind the illustration boundary
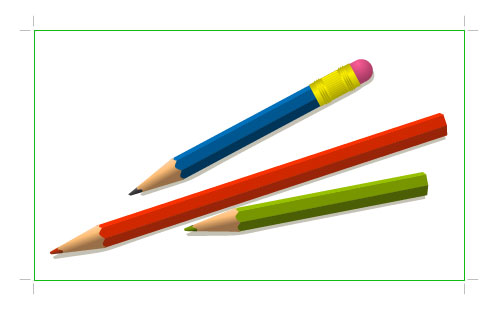
Sometimes parts of your illustration exceeds the bounds of your illustration. This is unwanted for some microstock agencies, so you have to trim it.
See the example:
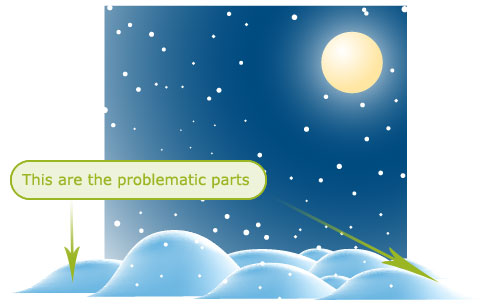
The problematic objects are the hills. Dreamstime and sometimes Shutterstock don’t have problem with it, but others will reject it (iStockphoto, Stockxpert). Fixing of such problem is quite easy with Clipping Mask (of course, that there are also other methods, how to fix it).
You have to draw a rectangle (with any fill and stroke), which will make the boundary of the final illustration. This rectangle must be in the top layer as the highest object.

Now select all objects (CTRL+A)
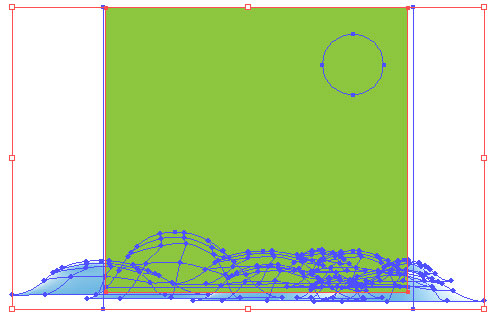
And apply the Clipping Mask – Object / Clipping Mask / Make (CTRL+7). The result should look like this:
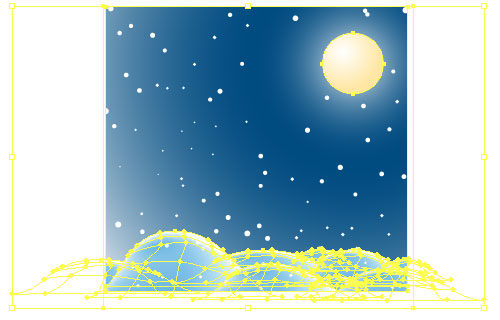
Click somewhere or deselect all objects (Select / Deselect or CTRL+SHIFT+A) and you will see the final result:

Crop Area
Sometimes the situation is a bit different – you have object on white background and want to specify some padding around them – in such case you have to define Crop Area. You will use this for JPG export, otherwise the object on your JPG preview would be from one side to another without any space around (it will be tightly cropped).
I will show it on this illustration:

Defining a Crop Area is really simply – just draw it with rectangle tool:
This rectangle can have any fill and stroke and can be positioned in any layer.
Now just select the rectangle and use Object / Crop Area / Make. And that’s all – you should see a cropping rectangle around it:
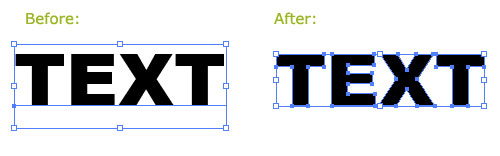
Convert fonts to outline
If you use some text in the illustration, you have to convert it to paths. Simply select the text object and apply Object / Expand:
Clean up
Delete all hidden layers and objects, or temporary object which are not part of the illustration. You can switch to Outline view (View / Outline or CTRL+Y) to see if everything is OK. Also you can use useful short cut for displaying all (hidden) objects on the canvas – Object / Show All or use short cut CTRL+ALT+3 (I wrote about it in one of my Illustrator tips & tricks).
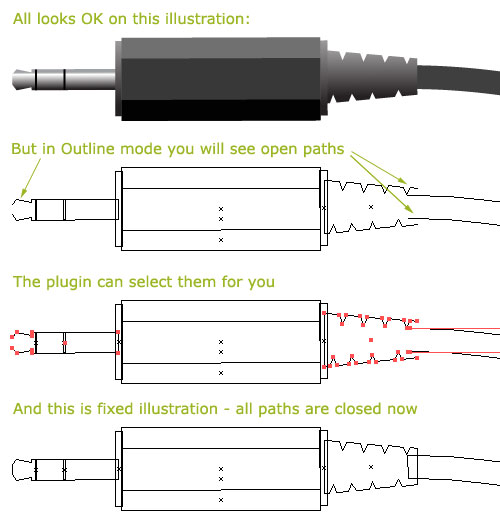
Close all open paths
You should close or delete (if such paths are not needed) all open paths. You can find them easily in Outline view (View / Outline or CTRL+Y) or use nice plugin, which will select them for you (read and download it from Rick Johnson/Graffix site).
The highest requirements on the illustrations has iStockphoto, you can read them all here in their Illustrator Training Manual – check carefully sections 4 and 5. The lowest requirements have Dreamstime
and Shutterstock (there you don’t need to close all paths).
 Create the EPS
Now should be your illustration ready for export to EPS format. As I mentioned above, microstock agencies needs the illustration in EPS format version Illustrator 8, to save it in this format, just use File / Save As (CTRL+SHIFT+S) and choose EPS format:
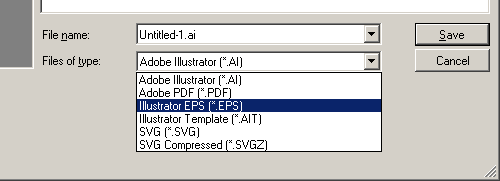
In the following dialog we must change some settings according to this image:
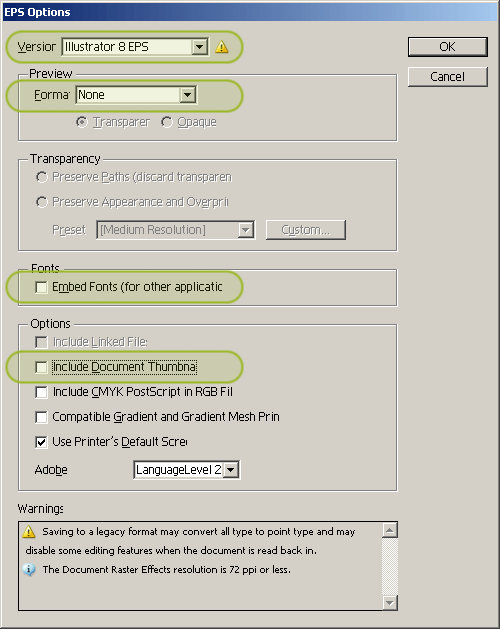
- First off all change the version to Illustrator 8 EPS
- Turn of Preview (select None) – Preview option would add just a TIFF image preview and would make the final EPS file bigger
- Turn off Embed fonts – all texts should be outlined (check the text about converting texts to paths above)
- Turn off Include Document Thumbnail (similar to Preview option)
Now just click OK and save it on the drive.
 Create the JPG preview
Last step is creating the JPG preview – some agencies need small previews, others accept big and anothers require big. So what size to choose? I prefer big previews, because they are accepted by most of the agencies and when you need smaller, you can always create them later from bigger ones.
For example Dreamstime sells vector illustrations same way as photos (you can upload the EPS as an additional format and it is not necessary), so the bigger versions generates bigger payments. This is the reason why I’m creating the JPG preview with dimensions around 16 Megapixels – 4000px × 4000px. I’m then selling those big JPGs also on Fotolia, Stockxpert, BigStockPhoto, because I’m too lazy to upload EPS files there (I prefer spending my time in Illustrator then on the websites).
So now we will create the JPG preview – you can use File / Save for Web & Devices or a bit complicated (but much quicker and for web designers well known) shortcut CTRL+ALT+SHIFT+S.
On the preview of the illustration, you can check the padding and croping and if you are not satisfied, just cancel the dialog and use Crop Area or Clipping Mask again as described above.
Next step in the dialog is switching to Original view, because then are all operations (changing the format and the size) much quicker.
Now you should change the format to JPG with Maximum quality (100) – see the image:
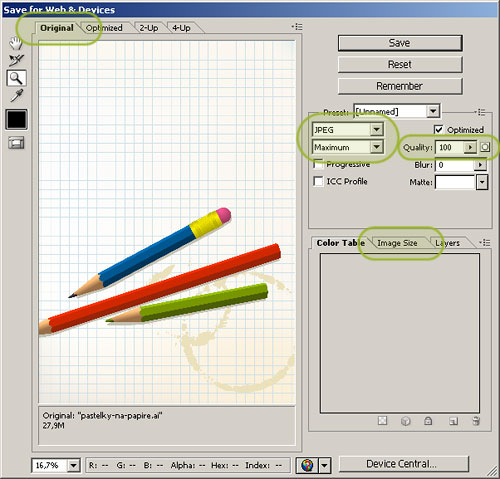
After that we need to change the size (dimensions) of the JPG image – this we can do in the Image Size tab:
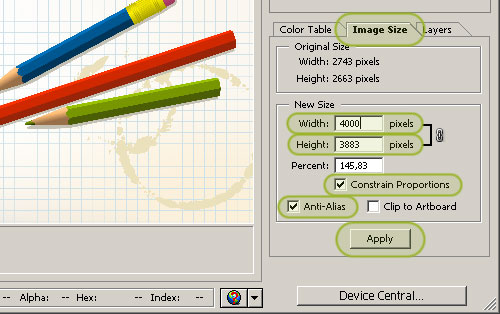
Change the width or the height (the second dimension should change automatically, because there is Constraint Proportions option selected). Use also Anti-alias for smoother curves and edges. And don’t forget to hit the Apply button.
The resizing can took few seconds (depends on the entered dimensions and also on the illustration’s complexity), when it is done, just save the file (button Save) on the drive.
Upload files to microstock
All work in Illustrator is done and now you have to choose some microstock sites (check my list of best microstock sites), register, upload and start earning some money! If you want to know how to start, check another my article: How to start selling photos and illustrations on microstock
nice and details article. like it.
Excellent article. Thanks for sharing these tips. They will definitely come in handy.
If you’re interested in selling on Microstock sites as illustrators or graphic atists try Clipartof.com
They are fast growing young midstock site that are good to work with offering 50% of sales.
Talking dollars per image not cents.
They are looking for artist.
http://www.clipartof.com/…reement.html
Let me know how you go.
Dennis
Thank you so much. I found this on shutterstock forum and it is helping me upload vectors. Thanks again!
Hello Orson, great article.
I have a question, beside the Clipping mask tip, you are talking about other ways to make it. Can you explain a bit if you know them, or maybe lead me toward another website?
thanks in advance.
Have a nice day.
Hi Maluson,
The other way, how to do it, is a bit more complicated, but preffered for some stock sites – here is the explanation from iStock article Let’s tidy UPloads -Simple tips and tricks on how to cleanup your vectors and keep customers happy:
The second (and our preferred) option is to simply trim off any objects hanging outside of your artboard. Trimming is quick and easy and will produce a tidy, neat and user friendly file.
The easiest method is to trim off excess objects using the tools located in the Pathfinder palette: Draw a shape outside your artboard, and select it along with one of the shapes you wish to trim. Use the ‘subtract from shape area’ button and you’re done!
To trim multiple shapes, copy your outside shape and paste it on top each shape you’re trimming. Use the ‘subtract from shape area’ for each shape you need trimmed, just keep pasting the same outside shape over your pasteboard.
Thank you for this great and useful info.
I have followed your instructions, when I save the eps in the transparency field I have to choose preserve path or apparence, I can’t leave it blank.
Can you tell me what I should do?
Thank you in advance.
Goingreen > Well this options are available only if you use transparency in your illustration.
Preserve paths will discard the transparency in your illustration, so you have to use Preserve Appearence but then the Illustrator will use some bitmaps and the illustration can be disabled by some stock agencies (try to use the the Custom button and adjust the Raster / Vector option, so it will not use raster images).
Again, once you start using transparency, the final EPS can be quite big (most of the microstock agencies has a size limit for EPS file!)
Great ideas in here. I must go look for that close paths plugin!
I dont know about this,. but selling images on those microstocks seem really complicated to me and what we would be appreciate be enough for our art work? just couple of cents per download. Live usually hard for an artist, me for example.
I’m looking for site that can give more commission than 80%. Is there any out there?
Hi Jojo Saka,
I’m selling my illustrations for few cents, that’s true, but on microstock you can sell one your illustration 20times in one day! (not only „can sell“ but really sell). That’s why I’m doing it.
I don’t think, that it’s too complicated. And of course that you shouldn’t sell there masterpieces, but simple illustrations, which took you few minutes of your time.
There are sites, that give you more than 80% commission, but those sites don’t have buyers :( I prefer sites, which give me $$$ :)
I simply love you. Thanks for the purple crayon. Just switched to Adobe from Corel…need I say more.
Hi Orson,
Firstly, thanks for creating this site – you’ve saved me many, many hours and enabled me to just get on with creating and uploading content. Massive thanks for that.
Secondly, just to let you know, there seems to be an empty space where your “Dreamstime category” article should be. I thought you should know it’s disappeared!
I got my first ten images accepted onto Dreamstime last week, which I’m really pleased about. A few more there and I’ll be ready to crack Shutterstock too!
Again, huge appreciation for your selfless efforts.
Regards
MM
Thanks MM for a comment. The Dreamstime category is still empty, because I didn’t have enough time to write some article about Dreamstime – it’s one of my favourite microstock agencies.
I wish you success on Shutterstock and if they don’t accept you, just try it again and again (as I can see from statistics, only 1 from 10 contributors are accepted on their first try).
Hi, maybe you’re interested on this. I started to work for mikrostock sites in March, this year, and i needed a tool, to prepare my images (EPS + JPG, you know how it goes). Then i found this script, which makes this work easier. I made some modifications on it and it is perfect for what i need. I’m using all the time, so if you need, check it out. Here is the link: http://www.oksancia.com/…ript-updated. This is not a spam, i’m just grateful to Oksancia.
Hi ordogz,
actually I’m also working on similar script (but hadn’t time to finish it yet), but mine should also check if there are some invisible or locked elements etc. But thanks for sharing, I will look at this script too.
Once I finish my script, I will write an article here and everybody can download it.
Hi Orson,
Have been reading through your site for a lot of time today. I noticed that you have mentioned that you create your vectors in very little time…
I am an illustrator and submit to around 4 stock sites. However I take a lot of time to complete my illustrations in Illustrator. Say about 8–12 hours per illustration…
Considering the time I take it doesn’t seem to pay that much. (However the minus is that I have a comparatively small portfolio)
But if there are any quick tips that you can share to save time while working in Illustrator it will be great! I also have a Wacom tablet which I hardly use…do you also use one? Any quick tips to create illustrations faster?
Thanks!
Aboli
Thanks a lot.
Great article! Very clear steps. This has helped me in readying my first vector. One final hitch I am facing is keywording. Should I add keywords to eps file or the jpg or both?
Hi Santhosh,
the keywords should be in the JPG file.
Sorry for late reply.. Thanks for that answer!
I just wanted to know if you are still submitting eps8 format to all sites or you submit eps10 also? I believe only istock doesn’t accept eps10. Also, do you submit raster versions of these also? If yes, how does sales of raster version compare.. Please excuse me if I am asking too many questions, but asking because you seem to be very much experienced in this field..
Hi Santhosh,
I don’t use EPS8 anymore (I stopped my uploads to iStock – too complicated and the results are quite poor). Now all microstocks accept EPS10, so this is without any problem.
I upload raster version now only on Dreamstime (the vector upload is too complicated), maybe later I will add there also the vector versions.
So I can’t compare raster x vector downloads.
Hi Orson,
Just want to ask if it’s possible to upload the same illustration or files as a portfolio to different microstock agencies?
Thanks
Hi mao,
sure, that you can upload to various sites, that is one of the advantages of roaylity free licence.
Hi Orson,
can you help me please ?! I keep getting the same rejection messages on dreamstime, regarding my illustrations : Poor execution. Please pay more attention to rough/jagged/faceted lines/curves. Lines and curves should be smooth, not aliased, in order to best serve the concept of the image.)
What should I do to prevent this? Thanks
Ivan, send me some your illustrations, so I can look at it.
I sent few problematic files to Orson via email, and he gave me an advice about my problem. I wrote this reply just to thank him in public. :)
Hello , Orson. Thanks for your helpful information. I have been having the same problem as IVAN has. I have gone over my work but cant see any problems with them. Would you be willing to look at some of my illustrations and critique them? thanks again.
Aaronb
Sure, you can send it to me.
Hi, Orson, I just made a logo for selling on 123rf.com and there requirement is that .eps file should be illustrator 8 compatible and has to be flattened so that no layer is present. But when I saved it, my .eps file shows all the layes present. Where I am wrong.? I am using cc version of ai. Kindly help!
Hi Orson,
Thank you for the tips. They are very helpful. I just started to learn using the illustrator to make some vectors. It’s fun at the beginning but recently I am keep running into “Bitmap” problem. Seems there are may “effects” in illustrator could cause “bitmap” problem. I was trying to create “Bokeh” effect. every time I use the blur function, it causes “bitmap” problem. but without using the blur beffect, I can’t create Bokeh effect. most of the video on YouTube teach to create Bokeh effect in Photoshop. Does that mean Photoshop won’t have bitmap problem. But I thought I can’t draw vectors from Photostock. Could you provide some tips to avoid creating bitmap problem but still be able to show the blur effect. It’s quiet challenging. I have asked several people and no one knows how to fix the problem.
Thank you in advance.
If you use blur effect, you will always get a raster image. So one solution is to use blend tool, or use blur effect and vectorize (trace) the result. In some simple cases (shapes) you can use mesh tool.
Thank you. another question. what program do most people use for stock vector drawing. I use illustrator. Can we use Photoshop or other program? I have seen lots of vectors look like color painting. can I draw it in illustrator ? or I have to use other program to draw it. thanks.
Thank you so much. I found this on shutterstock forum and it is helping me upload vectors. Thanks again!
Hello,
Thank you for the steps.
Do you know if compound paths are allowed ?
Yes, compound paths are allowed.
I have read and understood the crop marks. My illustration has a transparent background which i have made it into crop marks and i have already uploaded it in dreamstime and it is online. Now the dimensions mentioned in the website is the dimension of the transparent background or the crop marks boundary and the image will be obviously bit smaller than the mentioned dimension. Is that a problem. Will the person who downloads it think its the actual dimension of the image itself. Please let me know. Thank you.
Well, the best think, you can do is contacting support, they will give you a best answer. I think, that it is OK.
Thanks…..
I am very new to this microstock contribution. I make vectors and jpeg illustrations. I read in my websites that the sales are going down and microstock contribution even in shutterstock is not going be a good earning idea anymore. Is that true.
That’t true, the sales on microstock are slowly going down, but if you are good artist, you can earn quite a nice money, with something you love.
There will not be any better time to start with microstock, than right now :)
hmm……some downloads and little money would give me motivation…..
Uploading one or two vectors a day in shutterstock or uploading once for all together once in a week does it make a difference in downloads or anything
can you write a post to do this with new version of illustrator? cs6?
Hi Skoil,
Im working in CS5 (I dont like the Adobe subscription model and dont think, that there is some new importatnt feature in CC).
Nearly all the steps are same, just maybe there is not CROP tool in CS5, but the ARTBOARD tool.
I found this site from a CV / Resume template in Dreamstime. Very interesting!
My question is, if you convert the text to outlines and not include the font, how can a buyer edit the template text from a .eps?
Well, most of microstock sites don’t accept eps files with texts, that are not expanded :( So the user have to delete the outlines and put there his own texts…. Or you can buy it on Creative market, where are my templates with unexpanded texts.
Didn’t know about Creative market. Seems nice! Thanks
Creative Market is a nice place for buying templates. Or you can also buy it on Adobe Stock – they offer Illustrator, Photoshop and InDesign templates (all texts are editable).
hi. if it is possible for you could you tell me a bit please, how to save an ai file as eps(8) in illustrator cs3 for microstock that contains gradient and transparent objects?
Hi Sevinc,
this will be a problem. First, I have not CS3 and second, I dont think, that EPS8 can handle transparency – try EPS10, EPS10 is accepted in most microstock agencies…